Labels

Showing posts with label howto. Show all posts

Friday, January 27, 2012

How to Add a Calendar to Your Blog

A blog calendar can enhance the appearance of your blog and also help viewers keep track of blog posts, news and updates. You can add a calendar to your blog using various websites that allow you to design and add calendar tools. Once you have created your online calendar the website will provide the HTML code that you need to add to your blog.

Google Calendar

  1. Go to the Google search engine homepage and click on "more."

    Library RFID Systems

    Self Serve Check Out - Self Returns Book Sorters, Stock Take, Payments
    www.fetechgroup.com.au
  2. Select "Calendar" from the dropdown menu.
  3. Log in to your Google account. You will be taken to the calendar design page by Google. Using Google to create your calendar offers the following benefits.
    • Access your calendar using the link above your Gmail inbox.
    • Create private calendars for personal use as well as public calendars.
    • Merge calendars so information from different sources is combined in 1 calendar.

Localendar

  1. Create a free calendar for your blog using the Localendar website. You can create 3 types of calendars with the following calendar tools.
    • Personal: the personal calendar allows you to schedule personal tasks, publish local events on your blog and check the weather to make sure there will be no conflict in your plans due to weather conditions.
    • Group: you can give your blog visitors some permission to edit the group calendar. This type of calendar is ideal for planning parties, sports events and other social gatherings.
    • Organization: the organization calendar is suitable for office events. It allows workers to participate in forum discussions so they can decide when they want to arrange a company event.

Bravenet

  1. Visit the Bravenet website to create your free blog calendar. Your online calendar can have the following features.
    • Display your calendar in multiple views including daily, monthly and weekly.
    • Allow others to access details to events organized by you and share information about their own events.
    • Customize your calendar with different themes.
    • Create reminders that can be emailed to you and your guests when an event date is approaching.

Adding the Calendar HTML Code to Your Blog

  1. Copy the HTML code provided by the website that you used to create your calendar (the layout and details of the code can vary greatly depending on the calendar design).
  2. Paste the code within your blog HTML at the location where you want the calendar to appear. Give a gap of 1 empty line before and after the code to set it apart from the rest of the HTML on your blog.
  3. Save the changes that you have made and view your blog. You should see the calendar displayed in the area where you added the code.

    Supermicro SuperBlade®

    Intel® Xeon® based SuperBlade® ! Powered by up to 28 Quad-Core CPUs
    supermicro.com/CloudServerComputer

    Roll Surface Engineering

    Mirror Polishing & Plating Company Chrome Plating & Roll Fab/Repair
    www.mpp.net

Tuesday, January 17, 2012

How to Add a Blog Background

Bloggers usually change blog backgrounds to make their blog more visually appealing for visitors. However, a background image that is added incorrectly can confuse the viewer and cause visitors to browse away from your blog. To add a blog background correctly it is important to use the correct HTML codes.

STEP
  1. Go to the HTML page for your blog. If you are editing your blog offline then you can open it in Dreamweaver to change HTML. Blogging services like Blogger allow you to change HTML online by going to the Design page and selecting the "Edit HTML" tab. You need to be able to access the HTML codes for your blog, and how you do this can vary greatly depending on what blogging services and methods you use.

  2. Don't try to look for a separate image with a different color if all you want to do is change the background color. Instead, you can just edit your HTML to change the existing color to the one that you want.
    • Search for "HTML color chart" on the Internet. You should be able to find a table that displays different colors along with their color name and HEX (Hexadecimal) number. The HEX number is the number used within the HTML, so you need to remember the HEX number for the particular color that you want as your background.
    • Find the code on your blog that defines the background color. It will look like this.

body {
background-color:#XXXXXX;

You will see the HEX number of the existing color instead of the X's displayed in the sample code.
    • Change the HEX number to the number for the color that you want as your background. After you save and apply the new HTML, you will see the new color as the background.

Adding a Blog Background Image

  1. Select the image that you want to add as the background. There are many websites that allow you to download blog backgrounds or you can use an image that is already saved on your computer.
  2. Upload the image. Photo hosting websites such as Picasa, Flickr and Photobucket allow you to upload images for free. Your blog hosting service may also allow you to upload images in a similar way to how the rest of your blog is hosted.
  3. Get the image URL. To do this you need to open the image in your Internet browser and copy the URL where it is displayed.
  4. Insert the code for adding an image as the background. Here is the HTML code.

body {
background-image: url(image URL);

You need to add the code where the body of your blog HTML begins. Replace "image URL" with the full URL where your image is located.
  1. Save the changes after you edit HTML and view your blog. You should see the image added as the background.

    Source : www.wikihow.com

Monday, January 16, 2012

How to Create Horizontal Tabs Menu

What is horizontal tabs menu? horizontal tabs menu is bla..bla..bla... I can't explain anymore, he..he., it's look like this:


To create it is not as simple as it's look, it's complicated. You have to design button, you have to create CSS and HTML code. Now I will show you how to create "Horizontal tabs menu" in blogger.


The first thing you have to di is create an image like this:

and

If you can't to create it, you can use my below images:

blackleft.gifblackright.gif
greenleft.gifgreenright.gif
redleft.gifredright.gif
unguleft.gifunguright.gif
yellowleft.gifyellowright.gif
blueleft.gifblueright.gif
whiteleft.gifwhiteright.gif


Ok, let's begin

1. Login to Blogger, chose "Lay out --> Template --> Edit HTML"
2. Don't forget to backup your template first.
3. Check the "Expand Widget Templates" checkbox.
4. Try to find this code ]]></b:skin>, if you found it then put the code below above it

/*credits : http://trick-blog.blogspot.com */
#tabshori {
float:left;
width:100%;
font-size:13px;
border-bottom:1px solid #2763A5; /*Under Line, you can change or delete it */
line-height:normal;
}
#tabshori ul {
margin:0;
padding:10px 10px 0 50px; /* Menu position*/
list-style:none;
}
#tabshori li {
display:inline;
margin:0;
padding:0;
}
#tabshori a {
float:left;
background:url("http://blogoholic.info/files/menu/blackleft.gif") no-repeat left top;
margin:0;
padding:0 0 0 4px;
text-decoration:none;
}
#tabshori a span {
float:left;
display:block;
background:url("http://blogoholic.info/files/menu/blackright.gif") no-repeat right top;
padding:5px 14px 4px 4px;
color:#24618E; /*Text menu color*/
}
#tabshori a span {float:none;}
/* End IE5-Mac hack */
#tabshori a:hover {
background-position:0% -42px;
}
#tabshori a:hover span {
background-position:100% -42px;
}


you can change the bold text with other image, for example, if you want to chose my red menu image the code will be like this:

background:url("http://blogoholic.info/files/menu/redleft.gif") no-repeat left top;

background:url("http://blogoholic.info/files/menu/redright.gif") no-repeat right top;


5. Then copy the code below

<div id="tabshori">
<ul>
<!-- Change the links with your own links -->
<li><a href="http://trick-blog.blogspot.com"><span>Home</span></a></li>
<li><a href="http://trick-blog.blogspot.com"><span>Trik-Tips</span></a></li>
<li><a href="http://trick-blog.blogspot.com"><span>Free Template </span></a></li>
<li><a href="http://trick-blog.blogspot.com"><span>Blog Dictionary</span></a></li>
<li><a href="http:/trick-blog.blogspot.com"><span>Profile</span></a></li>
</ul>
</div >


change http://trik-tips.blogspot.com with your own link, and change the bold text with your own text.

6. Next step is to put the tabs menu into your blog, this more difficult because we have different templates. There are some methods to do this, Here is the methods, you can chose and try for any methods.

- methode A:
Find this code :<div id="content-wrapper">. if you found it, paste the above code (code number five) above it. Preview your template, if it looks good save your editting, but if it's not good try to put above this code </div>, you will find many codes like that, try to put the code above it and preview your your blog, do it more often until it's suitable for your template.

If you have nice with your menu position, is unnecessary to do methode B, but if you feel difficult to apply methode A you can try methode B
- methode B:
Find the below code :

<b:section class='header' id='header'
maxwidgets='1' showaddelement='no'>
<b:widget id='Header1' locked='true'
title='your blog title (Header)' type='Header'/>
</b:section>


change the green text so that to become like this:

<b:section class='header' id='header'
maxwidgets='2' showaddelement='yes'>
<b:widget id='Header1' locked='false'
title='your blog title (Header)' type='Header'/>
</b:section>


Save your setting, the go to "Page Elements" and click "Add page Element " on the header area, chose "HTML/JavaScript" then put the number five code above into "content" box, then click "save" and preview your new blog.


Source : http://trick-blog.blogspot.com/

Sunday, January 15, 2012

How to Create Dropdown Menu

What is dropdown menu?
Dropdown menu is like this :


Here is the trick how to create dropdown menu :

Copy the code below and put it on your page elements.


<select onChange="document.location.href=this.options[this.selectedIndex].value;">
<option value="0" selected>Blog Archive</option>
<option value="Links 1">Text 1</option>
<option value="Links 2">Text 2</option>
</select>

The red text is links, change it with your links.
The blue text is Anchor text. Yau must change it.

For example :


<select onChange="document.location.href=this.options[this.selectedIndex].value;">
<option value="0" selected>Blog Archive</option>
<option value="http://trick-blog.blogspot.com/2008/02/tutorial-to-create-dtree-menu.htmll"> How to Create Dtree Menul </option>
<option value="http://trick-blog.blogspot.com/2008/01/how-to-create-search-engine-in-blogger.html"> How to Create Search Engine </option>
</select>

The result would be like this:


To add more menu/item, put a code like below

<option value="Links 3">Text 3</option>

before this code </select>

If you want the links opened in new window, change the code below

<select onChange="document.location.href=this.options[this.selectedIndex].value;">

with this code ::

<select onchange="javascript:window.open(this.options[this.selectedIndex].value);">

The resul would be like this:


Source : http://trick-blog.blogspot.com/

Friday, January 13, 2012

Create Vertical Menu

We have learned how to create horizontal menu before. Now we will try to make a vertical menu. We will make a vertical menu like the image. Ok let's do it
.glossymenu, .glossymenu li ul{
list-style-type: none;
margin: 0;
padding: 0;
width: 185px; /*WIDTH OF MAIN MENU ITEMS*/
border: 1px solid black;
}
.glossymenu li{
position: relative;
}
.glossymenu li a{
background: white url('http://blog.superinhost.com/vertical/blue1.gif') repeat-x bottom left;
font: bold 12px Verdana, Helvetica, sans-serif;
color: white;
display: block;
width: auto;
padding: 5px 0;
padding-left: 10px;
text-decoration: none;
}
.glossymenu li ul{
position: absolute;
width: 190px;
left: 0;
top: 0;
display: none;
}
.glossymenu li ul li{
float: left;
}
.glossymenu li ul a{
width: 180px;
}
.glossymenu li a:visited, .glossymenu li a:active{
color: white;
}
.glossymenu li a:hover{
background-image: url('http://blog.superinhost.com/vertical/blue2.gif');
}

* html .glossymenu li { float: left; height: 1%; }
* html .glossymenu li a { height: 1%; }


You can change the menu color, look at the red text (blue1.gif and blue2.gif). Change it with some color menu below. For example, if you want to choose red color, then the code would be like this :
.glossymenu li a{
background: white url('http://blog.superinhost.com/vertical/red.gif') repeat-x bottom left;

dan
.glossymenu li a:hover{
background-image: url('http://blog.superinhost.com/vertical/red.gif');


Vertical Menu Color :

blue1.gif
blue2.gif
green1.gif
green2.gif
red1.gif
red2.gif
pink1.gif
pink2.gif
black1.gif
black2.gif


3. Save your template.
4. Then go to "Page Elements" menu
5. choose "Add a Gadget -->HTML/JavaScript" the insert the code below.

<ul id="verticalmenu" class="glossymenu">
<li><a href="/">Home</a></li>
<li><a href="http://trik-tips.blogspot.com">Trik Blog</a></li>
<li><a href="http://x-template.blogspot.com" >Free Template</a></li>
<li><a href="http://getebook.co.cc">Free Ebook</a></li>
</li>
</ul>


Note :
- The red code is the links.
- The Blue code is anchor text.
- If you want to add menu, just copy the blink code and paste it.

6. Then click "Save"

Source : http://trick-blog.blogspot.com/

Create Tab View

Tab View is very usefull box. We can fill it with many contain. It will save our blogs area. (See Image Below)

div.TabView div.Tabs
{
height: 24px;
overflow: hidden;
}
div.TabView div.Tabs a
{
float: left;
display: block;
width: 90px; /* Width top main menu */
text-align: center;
height: 24px; /* Height top main menu */
padding-top: 3px;
vertical-align: middle;
border: 1px solid #000;
border-bottom-width: 0;
text-decoration: none;
font-family: "Times New Roman", Serif; /* Top main menu font */
font-weight: 900;
color: #000; /* Top main menu font color */
}
div.TabView div.Tabs a:hover, div.TabView div.Tabs a.Active
{
background-color: #FF9900; /* Top main menu background color */
}
div.TabView div.Pages
{
clear: both;
border: 1px solid #6E6E6E; /* Content Border color */
overflow: hidden;
background-color: #FF9900; /* Content background color */
}
div.TabView div.Pages div.Page
{
height: 100%;
padding: 0px;
overflow: hidden;
}
div.TabView div.Pages div.Page div.Pad
{
padding: 3px 5px;
}


4. You can change the code according to the red text explanation. To get html color code see HERE
5. The next step is put the code below before </head>

<script src='http://superinhost.com/trikblog/tabview.js' type='text/javascript'/>


6. Then "save" it.
7. Go to "Page Elements" menu
8. Chose "Add Page Element" --> "HTML/Javascript" in place where you want to put this tab.
9. Insert this code :
<form action="tabview.html" method="get">
<div class="TabView" id="TabView">
<div class="Tabs" style="width: 350px;">
<a>Tab 1</a>
<a>Tab 2</a>
<a>Tab 3</a>

</div>
<div class="Pages" style="width: 350px; height: 250px;">

<div class="Page">
<div class="Pad">
Tab 1.1 <br />
Tab 1.2 <br />
Tab 1.3 <br />

</div>
</div>

<div class="Page">
<div class="Pad">
Tab 2.1 <br />
Tab 2.2 <br />
Tab 2.3 <br />

</div>
</div>

<div class="Page">
<div class="Pad">
Tab 3.1 <br />
Tab 3.2 <br />
Tab 3.3 <br />

</div>
</div>

</div>
</div>
</form>

<script type="text/javascript">
tabview_initialize('TabView');
</script>


Note :
- The number or the blue text(350px) Is size of the tabview.
- The green code is the main menu text
- The red code is the content of tabview. you can fill it with links, banner, widget, comment or anything.
- To add more menu, see on the blink code. Add the code under it.

Good luck every body.


Source : http://trick-blog.blogspot.com/

Tuesday, January 10, 2012

The trick to save memory capacity on Google Chrome

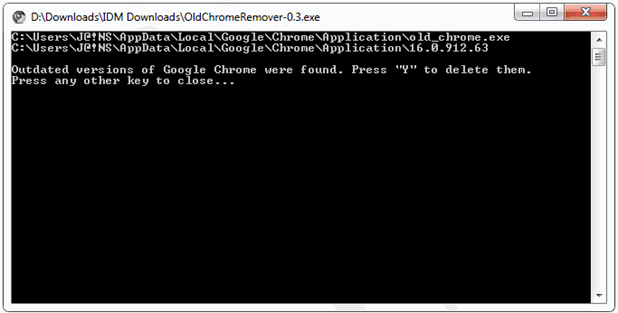
Google Chrome regularly release new updates to fix security issues and stability. But every time you update the version of Google Chrome long been the latest version of the file system from the old version will not be erased, so it will only increase the memory capacity on your hard disk and can make your computer work more slowly. ShaneGowland has created a simple tool but potent to delete old files in Google Chrome which is no longer needed automatically. Tool is given the name Old Chrome Remover Tool . How to use it is very easy.
  1. Download Old Chrome Remover Tool .
  2. Run the Chrome Remover Old Tool. This tool can work if your computer has installed the Microsoft. NET Framework 3.5 .
  3. Once the Command prompt window appears as below, will be read if you installed Google Chrome have an older version.
  4. The trick to save memory capacity on Google Chrome
  5. Press " Y "to delete the old version of Google Chrome. When finished press any key to close the window.
  6. The trick to save memory capacity on Google Chrome
  7. Google Chrome now that you put there is no more the old version left on your hard disk. And it will do little to reduce the burden of memory.

Source : http://blogbiztutor.blogspot.com

Friday, January 6, 2012

How to Edit Your MySpace Background

There are several ways to edit and customize your MySpace Background, just as there are many ways to build a website: You can learn straight code (specifically CSS), or you can use an editor. Since HTML and CSS can be a little confusing, an editor (also referred to as a generator) can help you create the code you need to personalize your MySpace profile. Here's how to use both.

Basic

  1. Find an editor or generator. Go to a search engine and type in any of the following phrases:
  2. Choose your colors, layout, font, and whatever else you want to customize.
  3. Preview your choices to make sure they're what you want.
  4. Generate the code.
  5. Copy and paste the code into the "About me" section of your MySpace profile.
  6. Press the "Save All Changes" button to see the changes go into effect (the Preview button will not reflect background customization).

Advanced

  1. Edit the "About Me" section of your profile.
  2. Insert the following code, which is essential in order for your custom background to show up. See the Tips for an alternative code.

    <style type="text/css">
    table, td {
    background-color:transparent;
    border:none;
    border-width:0;}
    </style>

  3. Customize the background:

    • Change the color of your background by inserting the following code right before the </style> tag. Replace color_code with a 6-character HEX code, but do not insert the # sign. You can find HEX color codes through any search engine.

      body{background-color: color_code;}
    • Make a tiled picture as your background by inserting the following code instead (you can find the URL of an image by right-clicking, choosing "Properties" and looking for the "Location"--see Warnings below):

      body{background-image:url("BACKGROUND URL HERE");
      background-attachment:fixed;}

    • Make a centered picture as your background by inserting the following code instead:

      body{background-image:url("BACKGROUND URL HERE");
      background-attachment:fixed;
      background-repeat:no-repeat;
      background-position:center,center;}


      • To change the location of the image on the page, replace the green text by experimenting with combinations of the "top" "center" or "bottom" as the first word and "left" "center" or "right" as the second word, with the two words separated by a comma. For example, replacing the green text with center,right will put your image on the right side of the profile, centered vertically.
      • To use one of your MySpace pictures, go to view that picture and then right click and choose "Properties." There will be a descriptor that says "Location:" followed by a URL. That is the URL where your image is stored and should be used to replace BACKGROUND URL HERE in the code.
  4. Press the "Save All Changes" button to see the changes go into effect (the Preview button will not reflect background customization).

    Press the "Save All Changes" button to see the changes go into effect (the Preview button will not reflect background customization).
    Press the "Save All Changes" button to see the changes go into effect (the Preview button will not reflect background customization).
    Source : www.wikihow.com

Thursday, January 5, 2012

How to Insert a PowerPoint to MySpace Profile

You can use HTML coding to add color, graphics, & sound to my Profile page in Myspace. But PowerPoint can not be inserted into the Profile page for the web browser can not play it. If you can convert a PowerPoint to flash, you can insert it to this page. Then how to do it? Just follow the steps.
  1. Convert PowerPoint to flash
    Convert PowerPoint to flash, you have three options
     
  2. Upload the converted flash to web
    You can use FREE file upload service listed here to upload the converted flash to web
    .
    http://www.mediawart.com/
    When upload is done,copy the URL of the uploaded flash file.
  3. Insert the flash file to my Profile page in Myspace
    Insert the flash file to my Profile page in MyspaceA.
    Insert the flash file to my Profile page in Myspace
    A.

    A
    .Log into your account in Myspace.

    B.Click Edit Profile for edits

    C. Use HTML coding to insert the flash to one of the target section of the profile page.

    <object type="application/x-shockwave-flash"data=" URL of the uploaded flash
    file " height="300" width="400" align="middle">
    <param name="movie" value="URL of the uploaded flash file "/>
    <param name="allownetworking" value="internal" />
    <param name="allowScriptAccess" value="never" />
    <param name="enableJSURL" value="false" />
    <param name="enableHREF" value="false" />
    <param name="saveEmbedTags" value="true" />
    </object>

    Note:" URL of the uploaded flash file" included in the coding should be the URL of the uploaded flash to Google page or other severs.

Source : www.wikihow.com

Tuesday, January 3, 2012

How to Add a PowerPoint File to a Blog

You can upload a PowerPoint to web then put a link in your blog for your visitors to download. They must have PowerPoint or PowerPoint viewer to view your presentation. If you want your PowerPoint to be viewed directly when visitors come to you blog, you should insert it as a flash file.

  1. Convert PowerPoint to flash
    Convert PowerPoint to flash, you have three options
  2. Upload the converted flash to web.
  3. Insert the flash file to Google Blog. Google Blog does not have a native feature for you to insert flash to a blog post directly. You should use some HTML coding to insert it.
    • Create a new post or open edit an exciting one
    • Switch to Edit Html pane
    • Insert the flash to blog with the following html coding
      <object type="application/x-shockwave-flash"data=" URL of the uploaded flash file " height="300" width="400" align="middle">
      <param name="movie" value="URL of the uploaded flash file "/>
      <param name="allownetworking" value="internal" />
      <param name="allowScriptAccess" value="never" />
      <param name="enableJSURL" value="false" />
      <param name="enableHREF" value="false" />
      <param name="saveEmbedTags"value="true" />
      </object>
      Note:" URL of the uploaded flash file" included in the coding should be the URL of the uplaoded flash to web with the uploading services.
  4. Publish Google Blog  

Source : www.wikihow.com


Monday, January 2, 2012

How to hide, remove, delete blog post, sidebar, footer page element or body blog on blogger

Edit HTML section , and find the code below:

]]></b:skin>

Then, place the code below, after the code above

<style type='text/css'>
<b:if cond='data:blog.pageType != &quot;item&quot;'>
<b:if cond='data:blog.pageType != &quot;static_page&quot;'>
.post, .post h1, .post h2, .post h3, .post-body, .post-footer, .jump-link,
.post-timestamp, .reaction-buttons,
.star-ratings, .post-backlinks,
.post-icons, .date-header{display:none;}
</b:if>
</b:if>
</style>

So, in your template code, approximately will look like the following:

]]></b:skin>
<style type='text/css'>
<b:if cond='data:blog.pageType != &quot;item&quot;'>
<b:if cond='data:blog.pageType != &quot;static_page&quot;'>
.post, .post h1, .post h2, .post h3, .post-body, .post-footer, .jump-link,
.post-timestamp, .reaction-buttons,
.star-ratings, .post-backlinks,
.post-icons, .date-header{display:none;}
</b:if>
</b:if>
</style>
</head>

<body>

<div id='bgwraper'>

How to display only post title?


To do it, such as the above steps, but delete this code : .post, .post h1, .post h2, .post h3, , and will look like below :
]]></b:skin>
<style type='text/css'>
<b:if cond='data:blog.pageType != &quot;item&quot;'>
<b:if cond='data:blog.pageType != &quot;static_page&quot;'>
.post-body, .post-footer, .jump-link,
.post-timestamp, .reaction-buttons,
.star-ratings, .post-backlinks,
.post-icons, .date-header{display:none;}
</b:if>
</b:if>
</style>

Want to remove sidebar or footer or header..? , simply by adding each class code, for example:

Hide Sidebar

<style type='text/css'>
<b:if cond='data:blog.pageType != &quot;item&quot;'>
<b:if cond='data:blog.pageType != &quot;static_page&quot;'>
.sidebar{display:none;}
</b:if>
</b:if>
</style>

Hide Footer

<style type='text/css'>
<b:if cond='data:blog.pageType != &quot;item&quot;'>
<b:if cond='data:blog.pageType != &quot;static_page&quot;'>
.footer{display:none;}
</b:if>
</b:if>
</style>

Hide, Blog Post, Sidebar, Footer, Header

<style type='text/css'>
<b:if cond='data:blog.pageType != &quot;item&quot;'>
<b:if cond='data:blog.pageType != &quot;static_page&quot;'>
.post, .post h1, .post h2, .post h3, .post-body, .post-footer, .jump-link,
.post-timestamp, .reaction-buttons,
.star-ratings, .post-backlinks,
.post-icons, .date-header, .sidebar, .footer, .header {display:none;}
</b:if>
</b:if>
</style>

Hide all , anything inside your body blog?

Add this code into body code " visibility : hidden; "

Example will look like below:

body {
background: #000000;
color: #F6F4F4;
font-size: 12px;
font-family: Arial, Tahoma, Verdana;
margin: 0px auto 0px;
padding: 0px;
visibility : hidden;
}

Source :   http://seoblog7.blogspot.com/

How to Add a Blog Background

Bloggers usually change blog backgrounds to make their blog more visually appealing for visitors. However, a background image that is added incorrectly can confuse the viewer and cause visitors to browse away from your blog. To add a blog background correctly it is important to use the correct HTML codes.
  1. Go to the HTML page for your blog. If you are editing your blog offline then you can open it in Dreamweaver to change HTML. Blogging services like Blogger allow you to change HTML online by going to the Design page and selecting the "Edit HTML" tab. You need to be able to access the HTML codes for your blog, and how you do this can vary greatly depending on what blogging services and methods you use.
  2. Don't try to look for a separate image with a different color if all you want to do is change the background color. Instead, you can just edit your HTML to change the existing color to the one that you want.
    • Search for "HTML color chart" on the Internet. You should be able to find a table that displays different colors along with their color name and HEX (Hexadecimal) number. The HEX number is the number used within the HTML, so you need to remember the HEX number for the particular color that you want as your background.
    • Find the code on your blog that defines the background color. It will look like this.

body {
background-color:#XXXXXX;

You will see the HEX number of the existing color instead of the X's displayed in the sample code.
    • Change the HEX number to the number for the color that you want as your background. After you save and apply the new HTML, you will see the new color as the background.

Adding a Blog Background Image

  1. Select the image that you want to add as the background. There are many websites that allow you to download blog backgrounds or you can use an image that is already saved on your computer.
  2. Upload the image. Photo hosting websites such as Picasa, Flickr and Photobucket allow you to upload images for free. Your blog hosting service may also allow you to upload images in a similar way to how the rest of your blog is hosted.
  3. Get the image URL. To do this you need to open the image in your Internet browser and copy the URL where it is displayed.
  4. Insert the code for adding an image as the background. Here is the HTML code.

body {
background-image: url(image URL);

You need to add the code where the body of your blog HTML begins. Replace "image URL" with the full URL where your image is located.
  1. Save the changes after you edit HTML and view your blog. You should see the image added as the background.


  2. Source : www.wikihow.com

Friday, December 23, 2011

How to Be Successful in Blogging

Blogs, originally called Web Logs, are a form of website in which you write in like a journal. Writing in web logs, called "Blogging," is becoming more and more popular in circles relating to everything from abstracts to news to zeros. There aren't many articles on the net that will show you how to actually take advantage of this useful new media. Becoming a successful blogger and maybe even make money off it may be easier than you thought. 

STEP

  1. Think about what you want to blog about. It could be anything; Reviews, Animals, Politics, Daily Life, there's a world of possibilities!

    Ping Blog Free

    Ping your blog, site or RSS Feed for Free! Gain traffic and exposure
    www.blogpingtool.com
  2. Try to come up with a name that relates to your subject, and make it interesting. Like your personal web site, you want a title that will draw the readers attention and make them want to read more. There is much more than titling it My Blog. Don't be afraid to be creative with your turn of phrase. Avoid symbols and non-standard characters.
  3. Use something like Microsoft's Microsoft Word® or Sun Microsystem's OpenOffice Suite® as a text editor to do word check and spell check before putting it into the host ftp.
  4. Find a good blog host. There are many free ones out there. BlogSpot, Blogger, and WordPress are good suggestions. A search will turn up many more. Sign up!
  5. Pick a nice theme. Don't make it too flaired up, it will make reading the text to hard. Try pYzam® has some good options, and add some Clip Art to accentuate your theme.
  6. Write, Write, Write!!! That is the most important part. Make your posts interesting.
  7. Advertise your blog. Post about it on forums, send emails, make ads! Try to get as many people as possible to read your blog. There are even pages that allow you to make money by the number of hits on the ads on your page. Some of them are created to generate keywords that web searches look for.
  8. Advertise others. Once your blog gets popular, start letting people put ads on your site. You will get cash for clicks! There is a variety of ad generators such as recommend Google Adsense®, that will generate the ads for your page. Some pay more than others, so look around.
  9. Keep Blogging and keep readers interested! The more you update your blog, and bring in fresh articles. That will keep people coming back for new articles.

    Supermicro SuperBlade®

    Intel® Xeon® based SuperBlade® ! Powered by up to 28 Quad-Core CPUs
    supermicro.com/CloudServerComputer

    Free Blog Promotion Tool

    Learn How To Get More Visitors. Marketing Your Blog Is Now Easier!
    www.buzzbaiting.com
    Source : www.wikihow.com