Labels

Tuesday, January 17, 2012

How to Add a Blog Background

Bloggers usually change blog backgrounds to make their blog more visually appealing for visitors. However, a background image that is added incorrectly can confuse the viewer and cause visitors to browse away from your blog. To add a blog background correctly it is important to use the correct HTML codes.

STEP
  1. Go to the HTML page for your blog. If you are editing your blog offline then you can open it in Dreamweaver to change HTML. Blogging services like Blogger allow you to change HTML online by going to the Design page and selecting the "Edit HTML" tab. You need to be able to access the HTML codes for your blog, and how you do this can vary greatly depending on what blogging services and methods you use.

  2. Don't try to look for a separate image with a different color if all you want to do is change the background color. Instead, you can just edit your HTML to change the existing color to the one that you want.
    • Search for "HTML color chart" on the Internet. You should be able to find a table that displays different colors along with their color name and HEX (Hexadecimal) number. The HEX number is the number used within the HTML, so you need to remember the HEX number for the particular color that you want as your background.
    • Find the code on your blog that defines the background color. It will look like this.

body {
background-color:#XXXXXX;

You will see the HEX number of the existing color instead of the X's displayed in the sample code.
    • Change the HEX number to the number for the color that you want as your background. After you save and apply the new HTML, you will see the new color as the background.

Adding a Blog Background Image

  1. Select the image that you want to add as the background. There are many websites that allow you to download blog backgrounds or you can use an image that is already saved on your computer.
  2. Upload the image. Photo hosting websites such as Picasa, Flickr and Photobucket allow you to upload images for free. Your blog hosting service may also allow you to upload images in a similar way to how the rest of your blog is hosted.
  3. Get the image URL. To do this you need to open the image in your Internet browser and copy the URL where it is displayed.
  4. Insert the code for adding an image as the background. Here is the HTML code.

body {
background-image: url(image URL);

You need to add the code where the body of your blog HTML begins. Replace "image URL" with the full URL where your image is located.
  1. Save the changes after you edit HTML and view your blog. You should see the image added as the background.

    Source : www.wikihow.com

Monday, January 16, 2012

How to Create Horizontal Tabs Menu

What is horizontal tabs menu? horizontal tabs menu is bla..bla..bla... I can't explain anymore, he..he., it's look like this:


To create it is not as simple as it's look, it's complicated. You have to design button, you have to create CSS and HTML code. Now I will show you how to create "Horizontal tabs menu" in blogger.


The first thing you have to di is create an image like this:

and

If you can't to create it, you can use my below images:

blackleft.gifblackright.gif
greenleft.gifgreenright.gif
redleft.gifredright.gif
unguleft.gifunguright.gif
yellowleft.gifyellowright.gif
blueleft.gifblueright.gif
whiteleft.gifwhiteright.gif


Ok, let's begin

1. Login to Blogger, chose "Lay out --> Template --> Edit HTML"
2. Don't forget to backup your template first.
3. Check the "Expand Widget Templates" checkbox.
4. Try to find this code ]]></b:skin>, if you found it then put the code below above it

/*credits : http://trick-blog.blogspot.com */
#tabshori {
float:left;
width:100%;
font-size:13px;
border-bottom:1px solid #2763A5; /*Under Line, you can change or delete it */
line-height:normal;
}
#tabshori ul {
margin:0;
padding:10px 10px 0 50px; /* Menu position*/
list-style:none;
}
#tabshori li {
display:inline;
margin:0;
padding:0;
}
#tabshori a {
float:left;
background:url("http://blogoholic.info/files/menu/blackleft.gif") no-repeat left top;
margin:0;
padding:0 0 0 4px;
text-decoration:none;
}
#tabshori a span {
float:left;
display:block;
background:url("http://blogoholic.info/files/menu/blackright.gif") no-repeat right top;
padding:5px 14px 4px 4px;
color:#24618E; /*Text menu color*/
}
#tabshori a span {float:none;}
/* End IE5-Mac hack */
#tabshori a:hover {
background-position:0% -42px;
}
#tabshori a:hover span {
background-position:100% -42px;
}


you can change the bold text with other image, for example, if you want to chose my red menu image the code will be like this:

background:url("http://blogoholic.info/files/menu/redleft.gif") no-repeat left top;

background:url("http://blogoholic.info/files/menu/redright.gif") no-repeat right top;


5. Then copy the code below

<div id="tabshori">
<ul>
<!-- Change the links with your own links -->
<li><a href="http://trick-blog.blogspot.com"><span>Home</span></a></li>
<li><a href="http://trick-blog.blogspot.com"><span>Trik-Tips</span></a></li>
<li><a href="http://trick-blog.blogspot.com"><span>Free Template </span></a></li>
<li><a href="http://trick-blog.blogspot.com"><span>Blog Dictionary</span></a></li>
<li><a href="http:/trick-blog.blogspot.com"><span>Profile</span></a></li>
</ul>
</div >


change http://trik-tips.blogspot.com with your own link, and change the bold text with your own text.

6. Next step is to put the tabs menu into your blog, this more difficult because we have different templates. There are some methods to do this, Here is the methods, you can chose and try for any methods.

- methode A:
Find this code :<div id="content-wrapper">. if you found it, paste the above code (code number five) above it. Preview your template, if it looks good save your editting, but if it's not good try to put above this code </div>, you will find many codes like that, try to put the code above it and preview your your blog, do it more often until it's suitable for your template.

If you have nice with your menu position, is unnecessary to do methode B, but if you feel difficult to apply methode A you can try methode B
- methode B:
Find the below code :

<b:section class='header' id='header'
maxwidgets='1' showaddelement='no'>
<b:widget id='Header1' locked='true'
title='your blog title (Header)' type='Header'/>
</b:section>


change the green text so that to become like this:

<b:section class='header' id='header'
maxwidgets='2' showaddelement='yes'>
<b:widget id='Header1' locked='false'
title='your blog title (Header)' type='Header'/>
</b:section>


Save your setting, the go to "Page Elements" and click "Add page Element " on the header area, chose "HTML/JavaScript" then put the number five code above into "content" box, then click "save" and preview your new blog.


Source : http://trick-blog.blogspot.com/

Sunday, January 15, 2012

How to Create Dropdown Menu

What is dropdown menu?
Dropdown menu is like this :


Here is the trick how to create dropdown menu :

Copy the code below and put it on your page elements.


<select onChange="document.location.href=this.options[this.selectedIndex].value;">
<option value="0" selected>Blog Archive</option>
<option value="Links 1">Text 1</option>
<option value="Links 2">Text 2</option>
</select>

The red text is links, change it with your links.
The blue text is Anchor text. Yau must change it.

For example :


<select onChange="document.location.href=this.options[this.selectedIndex].value;">
<option value="0" selected>Blog Archive</option>
<option value="http://trick-blog.blogspot.com/2008/02/tutorial-to-create-dtree-menu.htmll"> How to Create Dtree Menul </option>
<option value="http://trick-blog.blogspot.com/2008/01/how-to-create-search-engine-in-blogger.html"> How to Create Search Engine </option>
</select>

The result would be like this:


To add more menu/item, put a code like below

<option value="Links 3">Text 3</option>

before this code </select>

If you want the links opened in new window, change the code below

<select onChange="document.location.href=this.options[this.selectedIndex].value;">

with this code ::

<select onchange="javascript:window.open(this.options[this.selectedIndex].value);">

The resul would be like this:


Source : http://trick-blog.blogspot.com/

Friday, January 13, 2012

Create Vertical Menu

We have learned how to create horizontal menu before. Now we will try to make a vertical menu. We will make a vertical menu like the image. Ok let's do it
.glossymenu, .glossymenu li ul{
list-style-type: none;
margin: 0;
padding: 0;
width: 185px; /*WIDTH OF MAIN MENU ITEMS*/
border: 1px solid black;
}
.glossymenu li{
position: relative;
}
.glossymenu li a{
background: white url('http://blog.superinhost.com/vertical/blue1.gif') repeat-x bottom left;
font: bold 12px Verdana, Helvetica, sans-serif;
color: white;
display: block;
width: auto;
padding: 5px 0;
padding-left: 10px;
text-decoration: none;
}
.glossymenu li ul{
position: absolute;
width: 190px;
left: 0;
top: 0;
display: none;
}
.glossymenu li ul li{
float: left;
}
.glossymenu li ul a{
width: 180px;
}
.glossymenu li a:visited, .glossymenu li a:active{
color: white;
}
.glossymenu li a:hover{
background-image: url('http://blog.superinhost.com/vertical/blue2.gif');
}

* html .glossymenu li { float: left; height: 1%; }
* html .glossymenu li a { height: 1%; }


You can change the menu color, look at the red text (blue1.gif and blue2.gif). Change it with some color menu below. For example, if you want to choose red color, then the code would be like this :
.glossymenu li a{
background: white url('http://blog.superinhost.com/vertical/red.gif') repeat-x bottom left;

dan
.glossymenu li a:hover{
background-image: url('http://blog.superinhost.com/vertical/red.gif');


Vertical Menu Color :

blue1.gif
blue2.gif
green1.gif
green2.gif
red1.gif
red2.gif
pink1.gif
pink2.gif
black1.gif
black2.gif


3. Save your template.
4. Then go to "Page Elements" menu
5. choose "Add a Gadget -->HTML/JavaScript" the insert the code below.

<ul id="verticalmenu" class="glossymenu">
<li><a href="/">Home</a></li>
<li><a href="http://trik-tips.blogspot.com">Trik Blog</a></li>
<li><a href="http://x-template.blogspot.com" >Free Template</a></li>
<li><a href="http://getebook.co.cc">Free Ebook</a></li>
</li>
</ul>


Note :
- The red code is the links.
- The Blue code is anchor text.
- If you want to add menu, just copy the blink code and paste it.

6. Then click "Save"

Source : http://trick-blog.blogspot.com/

Create Tab View

Tab View is very usefull box. We can fill it with many contain. It will save our blogs area. (See Image Below)

div.TabView div.Tabs
{
height: 24px;
overflow: hidden;
}
div.TabView div.Tabs a
{
float: left;
display: block;
width: 90px; /* Width top main menu */
text-align: center;
height: 24px; /* Height top main menu */
padding-top: 3px;
vertical-align: middle;
border: 1px solid #000;
border-bottom-width: 0;
text-decoration: none;
font-family: "Times New Roman", Serif; /* Top main menu font */
font-weight: 900;
color: #000; /* Top main menu font color */
}
div.TabView div.Tabs a:hover, div.TabView div.Tabs a.Active
{
background-color: #FF9900; /* Top main menu background color */
}
div.TabView div.Pages
{
clear: both;
border: 1px solid #6E6E6E; /* Content Border color */
overflow: hidden;
background-color: #FF9900; /* Content background color */
}
div.TabView div.Pages div.Page
{
height: 100%;
padding: 0px;
overflow: hidden;
}
div.TabView div.Pages div.Page div.Pad
{
padding: 3px 5px;
}


4. You can change the code according to the red text explanation. To get html color code see HERE
5. The next step is put the code below before </head>

<script src='http://superinhost.com/trikblog/tabview.js' type='text/javascript'/>


6. Then "save" it.
7. Go to "Page Elements" menu
8. Chose "Add Page Element" --> "HTML/Javascript" in place where you want to put this tab.
9. Insert this code :
<form action="tabview.html" method="get">
<div class="TabView" id="TabView">
<div class="Tabs" style="width: 350px;">
<a>Tab 1</a>
<a>Tab 2</a>
<a>Tab 3</a>

</div>
<div class="Pages" style="width: 350px; height: 250px;">

<div class="Page">
<div class="Pad">
Tab 1.1 <br />
Tab 1.2 <br />
Tab 1.3 <br />

</div>
</div>

<div class="Page">
<div class="Pad">
Tab 2.1 <br />
Tab 2.2 <br />
Tab 2.3 <br />

</div>
</div>

<div class="Page">
<div class="Pad">
Tab 3.1 <br />
Tab 3.2 <br />
Tab 3.3 <br />

</div>
</div>

</div>
</div>
</form>

<script type="text/javascript">
tabview_initialize('TabView');
</script>


Note :
- The number or the blue text(350px) Is size of the tabview.
- The green code is the main menu text
- The red code is the content of tabview. you can fill it with links, banner, widget, comment or anything.
- To add more menu, see on the blink code. Add the code under it.

Good luck every body.


Source : http://trick-blog.blogspot.com/

Thursday, January 12, 2012

Download Free Internet Download Manager 5.18.2 Full Version, Serial Keygen, Crack


Internet Download Manager has a smart download logic accelerator that features intelligent dynamic file segmentation and safe multipart downloading technology to accelerate your downloads. Unlike other download accelerators and managers that segment files before downloading starts, Internet Download Manager segments downloaded files dynamically during download process. 

Internet Download Manager reuses available connections without additional connect and login stages to achieve better acceleration performance. Internet Download Manager supports proxy servers, ftp and http protocols, firewalls, redirects, cookies, authorization, MP3 audio and MPEG video content processing. IDM integrates seamlessly into Microsoft Internet Explorer, Netscape, MSN Explorer, AOL, Opera, Mozilla, Mozilla Firefox, Mozilla Firebird, Avant Browser, MyIE2, and all other popular browsers to automatically handle your downloads. You can also drag and drop files, or use Internet Download Manager from command line. Internet Download Manager can dial your modem at the set time, download the files you want, then hang up or even shut down your computer when it's done.

Other features include multilingual support, zip preview, download categories, scheduler pro, sounds on different events, HTTPS support, queue processor, html help and tutorial, enhanced virus protection on download completion, progressive downloading with quotas (useful for connections that use some kind of fair access policy or FAP like Direcway, Direct PC, Hughes, etc.), built-in download accelerator, and many others. 


Features:
  All popular browsers and applications are supported! Internet Download Manager has been tested with the following browsers: Internet Explorer, MSN Explorer, AOL, Netscape Communicator, Netscape 6, Netscape 7, Mozilla, Mozilla Firefox, Mozilla Firebird, Opera, NetCaptor, UltraBrowser, Slim Browser, Avant Browser, MyIE2, Optimal Desktop, Ace Explorer, Advanced Browser, 27 Tools-in-1 Wichio Browser, WindowSurfer, 550 Access Browser, FineBrowser Freeware, Kopassa Browser, Fast Browser Pro, Enigma Browser, GoSuRF, K-Meleon, Smart Explorer, The Off By One Web Browser, Smartalec Voyager, CrystalPort AppCapture, The Family Browser, XANA Web Browser, Bluto, AutoSurf, 32bit Web Browser, BrowseMan, WrestlingBrowser, Eminem Browser, UltraBrowser, Cygsoft LDAP Browser, and Net M@nager. Internet Download Manager supports all versions of popular browsers, and can be integrated into any 3rd party Internet applications.

Easy downloading with one click. When you click on a download link in a browser, IDM will take over the download and accelerate it. IDM supports HTTP, FTP, HTTPS and MMS protocols.

Download Speed Acceleration. Internet Download Manager can accelerate downloads by up to 5 times due to its intelligent dynamic file segmentation technology. Unlike other download managers and accelerators Internet Download Manager segments downloaded files dynamically during download process and reuses available connections without additional connect and login stages to achieve best acceleration performance.

Download Resume. Internet Download Manager will resume unfinished download from the place where they left off.
YouTube grabber. Internet Download Manager can grab FLV videos from popular sites like YouTube, MySpaceTV, and Google Video.

Simple installation wizard. Quick and easy installation program will make necessary settings for you, and check your connection at the end to ensure trouble free installation of Internet Download Manager

Drag and Drop. You may simply drag and drop links to IDM, and drag and drop downloaded files out of Internet Download Manager.

Automatic Antivirus checking. Antivirus checking makes your downloads free from viruses and trojans.

Advanced Browser Integration. When enabled, the feature can be used to catch any download from any application. None of download managers have this feature.
Built-in Scheduler. Internet Download Manager can connect to the Internet at a set time, download the files you want, disconnect, or shut down your computer when it's done.

IDM includes web site spider and grabber. IDM downloads all required files that are specified with filters from web sites, for example all pictures from a web site, or subsets of web sites, or complete web sites for offline browsing. It's possible to schedule multiple grabber projects to run them once at a specified time, stop them at a specified time, or run periodically to synchronize changes.

IDM supports many types of proxy servers. For example, IDM works with Microsoft ISA, and FTP proxy servers.
IDM supports main authentication protocols: Basic, Negotiate, NTLM, and Keberos. Thus IDM can access many Internet and proxy servers using login name and password.

Download All feature. IDM can add all downloads linked to the current page. It's easy to download multiple files with this feature.

Customizable Interface. You may choose the order, and what buttons and columns appear on the main IDM window.
Download Categories. Internet Download Manager can be used to organize downloads automatically using defined download categories.

Quick Update Feature. Quick update may check for new versions of IDM and update IDM once per week.
Download limits. Progressive downloading with quotas feature. The feature is useful for connections that use some kind of fair access policy (or FAP) like Direcway, Direct PC, Hughes, etc.

IDM is multilingual. IDM is translated to Albanian, Arabic, Azerbaijan, Bosnian, Bulgarian, Chinese, Croatian, Czech, Danish, Dutch, Farsi, French, German, Greek, Hebrew, Hungarian, Italian, Japanese, Korean, Lithuanian, Macedonian, Norwegian, Polish, Portuguese, Romanian, Russian, Serbian, Slovak, Slovenian, Spanish, Thai, Turkish, and Uzbek languages. 


Source : http://learnhackz.blogspot.com/

Tuesday, January 10, 2012

The trick to save memory capacity on Google Chrome

Google Chrome regularly release new updates to fix security issues and stability. But every time you update the version of Google Chrome long been the latest version of the file system from the old version will not be erased, so it will only increase the memory capacity on your hard disk and can make your computer work more slowly. ShaneGowland has created a simple tool but potent to delete old files in Google Chrome which is no longer needed automatically. Tool is given the name Old Chrome Remover Tool . How to use it is very easy.
  1. Download Old Chrome Remover Tool .
  2. Run the Chrome Remover Old Tool. This tool can work if your computer has installed the Microsoft. NET Framework 3.5 .
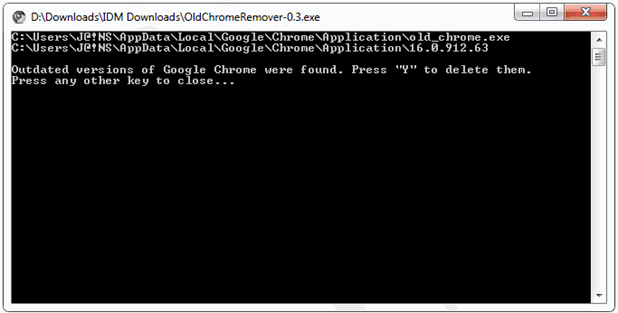
  3. Once the Command prompt window appears as below, will be read if you installed Google Chrome have an older version.
  4. The trick to save memory capacity on Google Chrome
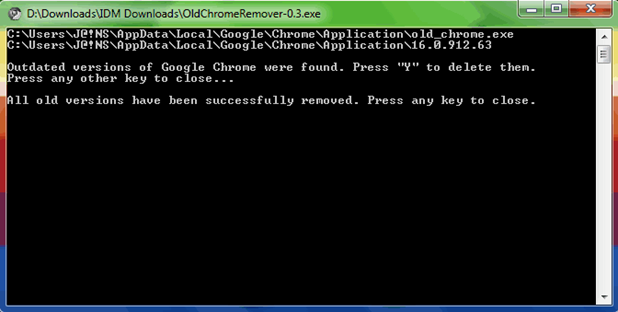
  5. Press " Y "to delete the old version of Google Chrome. When finished press any key to close the window.
  6. The trick to save memory capacity on Google Chrome
  7. Google Chrome now that you put there is no more the old version left on your hard disk. And it will do little to reduce the burden of memory.

Source : http://blogbiztutor.blogspot.com